
Table of Contents
- Signs of Water Damage Behind Drywall You Shouldn’t Ignore
- How to Use a Moisture Meter for Walls
- Thermal Imaging for Moisture Detection: Seeing What’s Hidden
- Checking Baseboards, Corners, and Other High-Risk Areas
- DIY vs. Professional Moisture Detection: Tools and Trade-Offs
- What to Do After You Find Hidden Moisture
- Frequently Asked Questions
Last Updated: September 23, 2026
Signs of Water Damage Behind Drywall You Shouldn’t Ignore
Identifying hidden moisture in walls starts with your eyes. Water almost always leaves a trail, even when the leak stays out of sight. At The Mold Consultant, LLC, we’ve inspected many walls across the Oklahoma City metro area, and visible damage is usually the smaller half of the problem.
Visual Cues: Discoloration, Staining, and Peeling Paint
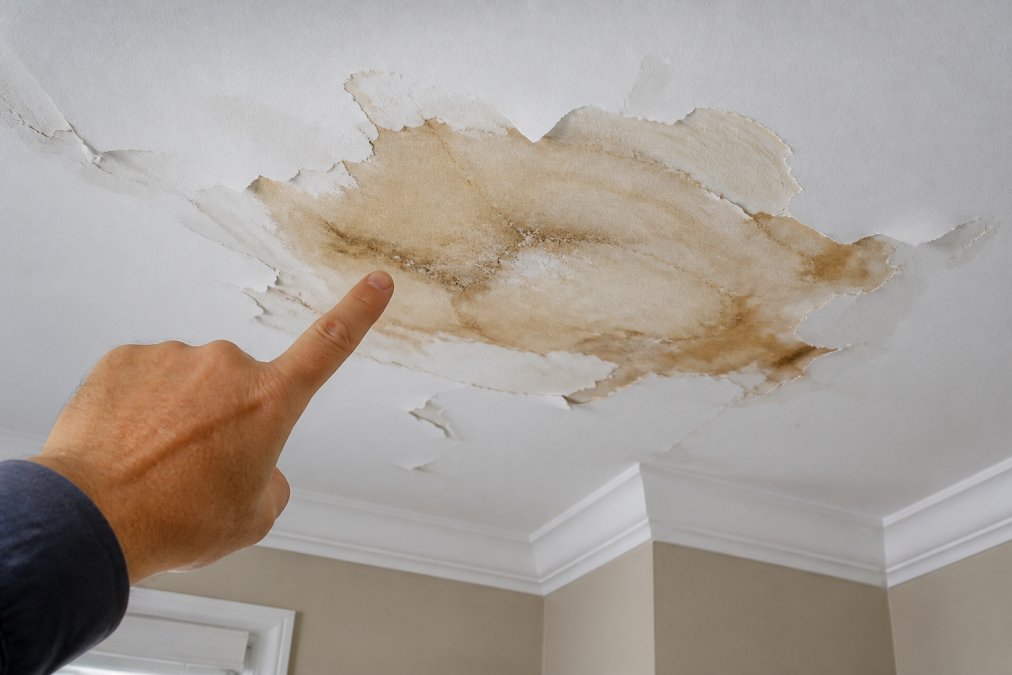
Discoloration is the most common early clue: yellow, brown, or gray patches that spread outward from a leak point.
Other visual signs include:
- Paint that bubbles, cracks, or peels away from the wall
- A chalky white powder called efflorescence on brick or concrete
- Dark speckling that could be mold growth
- Staining along the top of baseboards
Texture Changes: Warping, Buckling, and Soft Spots
Water changes how drywall and plaster feel. Press gently on a suspect area. A soft, spongy spot means the material has absorbed water and lost strength.
Watch for these texture changes:
- Warping: the wall bows outward or inward
- Buckling: seams push apart or ripple
- Soft spots: the surface gives when pressed
- Loose tape: drywall joints separate from the wall
How to Use a Moisture Meter for Walls
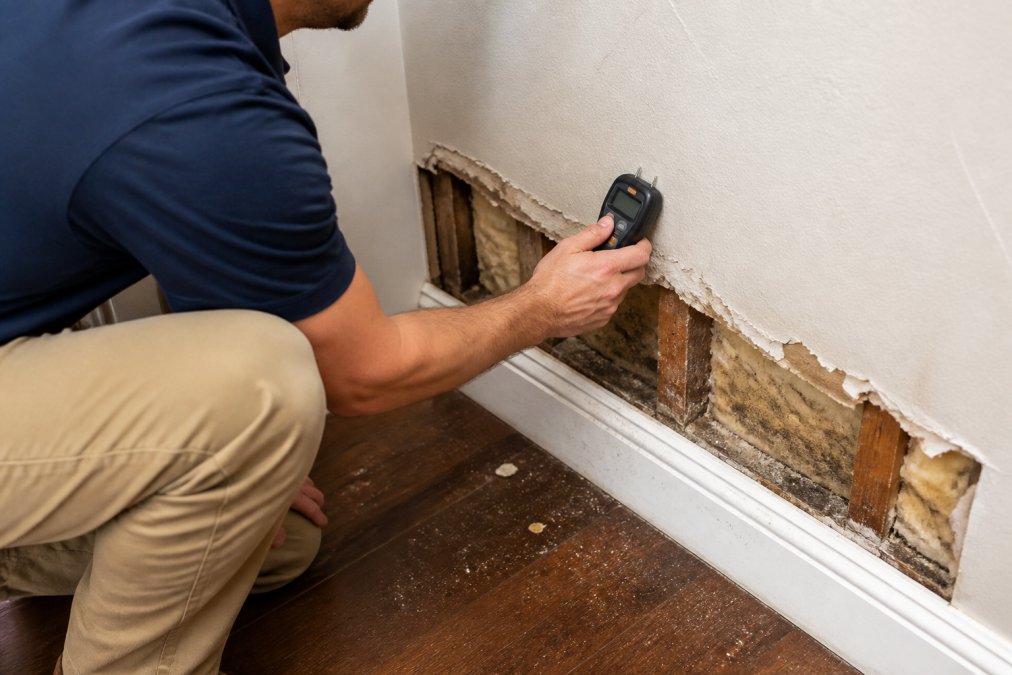
A moisture meter for walls gives you a number instead of a guess. These handheld tools measure water content in drywall, plaster, and wood. They’re the fastest way to confirm what your eyes suspect.
Take readings at the same spot on both sides of a wall. If the back side reads much higher, moisture is likely traveling through from a leak behind the wall, not from room humidity.
Pin-Type vs. Pinless Sensors: Which One to Choose
Pin-type sensors push two small probes into the material and read moisture at the exact point of contact. They work well on drywall and bare wood but leave tiny holes.
| Meter Type | Best For | Drawback |
|---|---|---|
| Pin-type | Precise spot readings, bare materials | Leaves small holes |
| Pinless | Finished walls, non-destructive scans | Shallow depth, surface-focused |
Reading the Number: What Counts as Wet for Each Material
A reading only means something compared to the right baseline for that material, the same percentage that signals a problem in drywall can be normal in masonry. General ranges:
- Drywall and plaster: readings above roughly 0.5% to 1% moisture content on a pin meter usually warrant a closer look. Drywall is a sponge; even a small percentage above baseline often means active intrusion.
- Wood framing and trim: wood is hygroscopic, meaning it absorbs and releases moisture with the seasons. A common rule of thumb is that readings above about 12% to 15% suggest a problem, while readings in the 6% to 12% range are often normal for interior framing. Wood above roughly 20% is at risk for wood-decay fungi.
- Masonry, brick, and concrete: these materials hold more ambient moisture by nature. A pinless meter is usually the better tool here because pins can’t penetrate far enough to give a meaningful reading. Compare the suspect area to a known-dry section of the same wall rather than to an absolute number.
Step-by-Step: Taking Accurate Readings
Follow these steps for reliable results:
- Wipe the wall surface clean and dry.
- Set the meter to the correct material mode (drywall, plaster, or wood).
- Press the meter flat against the wall, or push pins in gently.
- Record the reading and the location.
- Compare readings across the room to find the baseline.
- Recheck the same spots after a rainstorm.
Readings above the dry baseline suggest water intrusion. A hygrometer can track relative humidity: indoor RH above roughly 60% for extended periods supports mold growth on its own, even without a leak, so pair meter readings with a humidity check before assuming the source is plumbing or a roof.
Meter Limits: What These Tools Cannot Tell You
A moisture meter confirms water is present, but it cannot tell you where the water came from, how far it spread inside the cavity, or whether mold is already growing. A high reading may reflect a leak directly behind that point or water that traveled along a stud from several feet away. Meters are a starting point, not a diagnosis, pair them with a visual inspection of the cavity (if accessible), a thermal scan, and, when odor or visible growth is present, professional air sampling.
Thermal Imaging for Moisture Detection: Seeing What’s Hidden
Thermal imaging for moisture detection shows temperature differences across a wall. Wet areas cool as water evaporates, appearing as dark or cool patches on an infrared camera. It finds moisture you can’t see yet and scans a whole wall in seconds without touching it.
How Infrared Cameras Reveal Temperature Anomalies
An infrared camera reads surface temperature and turns it into a color map. Cool spots often mean dampness or evaporative cooling. Warm spots can point to hidden pipes or air leaks.
Checking Baseboards, Corners, and Other High-Risk Areas
Corners and baseboards hide moisture better than any other spot in a home. Water pools in low areas and creeps into seams where you rarely look. Pull back the carpet edge and check the bottom of each baseboard.
Focus your search on these high-risk zones:
- Baseboards: look for swelling, staining, or separation from the wall
- Corners: check where two walls meet, especially below grade
- Around windows and doors: look for cracked caulk and soft trim
- Under sinks and behind appliances: check for slow plumbing leaks
- Basements and crawl spaces: watch for seepage and musty odor
What Moisture Looks Like in Each Wall Material
Most guides treat every wall the same, but drywall, wood paneling, and masonry each fail differently, and the earliest sign differs for each.
The First 24 Hours After You Confirm Moisture
Detection is only useful if you act on it. Mold can begin colonizing a wet surface within 24 to 48 hours, so the first day matters most. A practical sequence:
- Shut off the water if you can identify the source. For a supply-line leak, close the nearest shutoff valve. For a roof or drainage issue, you can’t stop the water immediately, but you can document it.
- Photograph everything before you touch it. Take wide shots of the room and close-ups of stains, meter readings (with the display visible), and any visible mold. These photos are the backbone of an insurance claim.
- Move furniture, electronics, and stored items away from the wall. Wet drywall transfers moisture to anything touching it, and mold spores settle on soft goods quickly.
- Start drying the surface. Run box fans and a dehumidifier pointed at the affected wall. Keep windows closed if outdoor humidity is high. Aim to bring the wall back to its dry baseline within 48 hours.
- Do not paint, caulk, or patch over the area yet. Sealing a damp wall traps moisture and accelerates mold growth behind the finish.
- Recheck with your meter every 12 hours. If readings are not dropping, the source is still active or the cavity is holding water that surface drying can’t reach.
- Call a professional if readings stay elevated past 48 hours, if you smell musty odor, or if you see any dark speckling. At that point the problem is inside the cavity, not on the surface.
Never ignore a musty odor, even if you see no stains. Odor usually means mold growth is already active behind the wall. By the time you smell it, the problem has been growing for a while.
The material tells you how bad it is. Drywall fails fast and often needs replacement. Wood warps and holds odor. Masonry wicks slowly but persistently. Match your response to the material, not just to the size of the stain.
DIY vs. Professional Moisture Detection: Tools and Trade-Offs
DIY detection works for obvious signs: a moisture meter and a careful walk-through can catch surface-level dampness. But DIY tools can’t see deep inside a wall cavity or confirm whether mold is present. Professionals use thermal cameras, pin and pinless meters, and air sampling together, and they trace a leak back to its source instead of just marking the wet spot.
Consider calling a pro when you notice:
- Moisture that returns after you dry it out
- A musty odor with no visible source
- Soft or crumbling drywall
- Any sign of mold growth
- A recent leak or flood
What to Do After You Find Hidden Moisture
Finding moisture is step one; fixing the source is step two. Skip that step and the problem comes right back. The action plan:
- Stop the water source. Repair the leak, seal the gap, or fix the drainage.
- Dry the area fast. Use fans and dehumidifiers to pull moisture out within 48 hours.
- Remove damaged material. Wet drywall and insulation usually can’t be saved.
- Check for mold. Look for dark spots and that musty odor.
- Verify the fix. Recheck with a moisture meter after a few days.
- Document everything. Photos and readings help with insurance.
The real difference between a small fix and a major repair comes down to speed. Drying a wall within 48 hours often saves it. Waiting a week usually means replacing it.
Frequently Asked Questions
How can I tell if there’s moisture behind a wall?
Look for discoloration, staining, peeling paint, or a musty odor. You can also use a moisture meter for walls or thermal imaging for moisture detection. A pin-type sensor gives direct readings, while a pinless meter scans larger areas. If you notice warping or soft spots, moisture is likely present and should be investigated further.
Is there a tool that can detect moisture in walls?
Yes, several tools can help. A moisture meter (pin-type or pinless) measures water content in drywall, plaster, or wood. Thermal imaging cameras detect temperature differences caused by evaporative cooling, revealing hidden moisture. Hygrometers measure relative humidity. For best results, combine a moisture meter with thermal imaging to confirm and map the affected area.
Can my phone detect moisture?
No, smartphones cannot directly detect moisture behind walls. While some apps use the camera or sensors to estimate humidity, they are not reliable for detecting hidden moisture. Professional-grade moisture meters and infrared cameras are required for accurate diagnosis. Relying on a phone could delay finding a serious leak.
What draws moisture out of walls?
Moisture is drawn out through evaporation, which is why you may see bubbling paint or smell a musty odor. However, if the source of water intrusion (like a plumbing leak or seepage) is not fixed, moisture will keep returning. Proper ventilation and vapor barriers help, but identifying and repairing the source is the only permanent solution.