
Table of Contents
- Why a Mold Inspection Checklist Belongs in Every Realtor’s Toolkit
- Stage 1: Pre-Listing Walkthrough and Seller Disclosure
- Signs of Mold in a House: What Realtors Can Document Without Diagnosing
- Stage 2: Showings and Buyer Questions
- Mold Testing When Buying a House: What Realtors Should Explain to Clients
- Questions to Ask a Mold Inspector Before You Refer One
- Reading the Mold Inspection Report for Real Estate Transactions
- Stage 3: Escalation Decision Tree and Client-Safe Scripts
- Frequently Asked Questions
Last Updated: October 17, 2026
Why a Mold Inspection Checklist Belongs in Every Realtor’s Toolkit
A mold inspection checklist for realtors is a documented, room-by-room walkthrough that records moisture indicators, visible growth, and musty odors without diagnosing a health condition. At The Mold Consultant, LLC, we provide expert mold inspection services for agents who need a defensible paper trail, not a medical opinion.
A realtor’s job is disclosure, not diagnosis. Write “mold” and you’ve made a claim you can’t support; write “dark staining with elevated moisture at the sill” and you’ve documented a fact.
That distinction protects your client, your broker, and your commission. Below, we walk through each transaction stage: what to record, what to say, and when to hand the file to a qualified inspector.
Never write “mold” as a conclusion in a listing or disclosure document unless a lab report or licensed assessor confirms it. Use “visible growth,” “mold-like staining,” or “musty odor” instead. A diagnostic claim you can’t back up can void an inspection contingency and expose you to a misrepresentation complaint.
Stage 1: Pre-Listing Walkthrough and Seller Disclosure
Start the pre-listing sweep before the photographer arrives. Sellers hide problems behind fresh paint and staged furniture, so walk the property with a flashlight, a moisture meter, and a phone set to timestamp photos. The goal is a dated record you can hand to the seller and reference if a buyer’s inspector later finds something you missed.
Build the Pre-Listing File Before You Walk
A defensible pre-listing file has five parts:
- Property identification sheet – address, listing date, agent name and license number, and the date and time of the walkthrough.
- Dated photo log – one folder per room, file names that include the room and the date (for example,
primary-bath-sill-2026-10-17.jpg). - Moisture reading log – a table with columns for room, surface, meter reading, and material (wood, drywall, or concrete). Meter readings are relative, not absolute, so record the material.
- Observation notes – what you saw, smelled, or measured, in neutral language.
- Seller communication record – the date you delivered the summary, what you asked the seller to do, and their response.
Keep the file in the transaction folder, not on a personal phone. If it is ever subpoenaed, you want a single, complete record.
The Room-by-Room Sweep, With What to Record
Run the sweep in the same order every time. For each room, record the location, the material, and the indicator.
- Bathrooms – check caulk lines, grout, the toilet base, and under-sink cabinets for soft wood, peeling paint, or dark staining. Record the meter reading at the toilet base and under the sink trap.
- Kitchen – look behind the refrigerator, under the sink, and around the dishwasher for water stains and swelling. Pull the refrigerator out if safe; the ice-maker line and drip pan are common sources.
- Laundry area – inspect the dryer vent for lint buildup and disconnected ductwork, and check the washer supply hoses and drain pan.
- Windows and frames – note condensation, fogged glass, and sill staining. Record whether the window is single- or double-pane; failed seals are a common condensation source.
- Ceilings and walls – photograph water stains, rings, or bubbling paint. Note whether the stain is active (soft, damp, spreading) or old (dry, crusty, painted over).
- Attic – check roof sheathing, rafters, and insulation for dark staining or damp insulation. Look for daylight through the roof deck and rusted nail heads, which mark long-term moisture.
- Basement and crawl spaces – look for efflorescence, standing water, and musty odor. Note whether a vapor barrier is present and intact.
- Exterior drainage – confirm gutters discharge away from the foundation and grade slopes away from the house. Note any downspout that dumps within a few feet of the foundation.
Photograph every finding with your phone’s timestamp on. A dated image log is worth more than a paragraph of description and is the first thing a broker’s errors-and-omissions carrier will ask for.
Seller Disclosure: What the Forms Actually Ask
Most state seller disclosure forms ask directly about water intrusion, prior repairs, and known defects. Wording varies, but the categories are consistent: known water damage, known mold, known repairs, and known insurance claims. Read the form before you walk so you know which questions your observations will touch.
If your walkthrough contradicts the disclosure, flag it in writing and let the seller correct it. Do not correct it for them or advise leaving a question blank; a blank answer is still an answer.
A practical sequence:
- Deliver your written summary to the seller before the listing goes live.
- Ask the seller to review the disclosure against your summary and amend anything now inaccurate.
- If the seller declines to amend, document that you delivered the summary and the seller chose not to change the form.
- Do not put your own conclusion about the cause of any staining into the disclosure. The seller discloses; you document.
Seller Conversation Scripts for the Pre-Listing Meeting
Sellers often want reassurance that staining is “just old water” or that stain-blocking primer will solve it. Stay neutral and put the decision back on the seller in writing.
- “I’m not able to tell you what this is. I can tell you where it is and what the meter reads, and I recommend a professional evaluation before we list.”
- “The disclosure asks about prior water damage. If you had a repair here, the documentation will help the buyer’s inspector and speed up the contingency period.”
- “I’ve noted this in the pre-listing summary. If you choose not to address it before listing, I’ll note that you reviewed the summary and declined.”
- “Painting over staining without fixing the moisture source usually shows up again during the buyer’s inspection.”
Never speculate about cost, severity, or health effects. Those guesses come back as promises, and a seller who relied on your estimate can file a complaint.
Photograph the moisture meter reading next to the stained surface in the same frame. A single image showing the reading and the location is far harder to dispute than two separate photos taken minutes apart.
Signs of Mold in a House: What Realtors Can Document Without Diagnosing
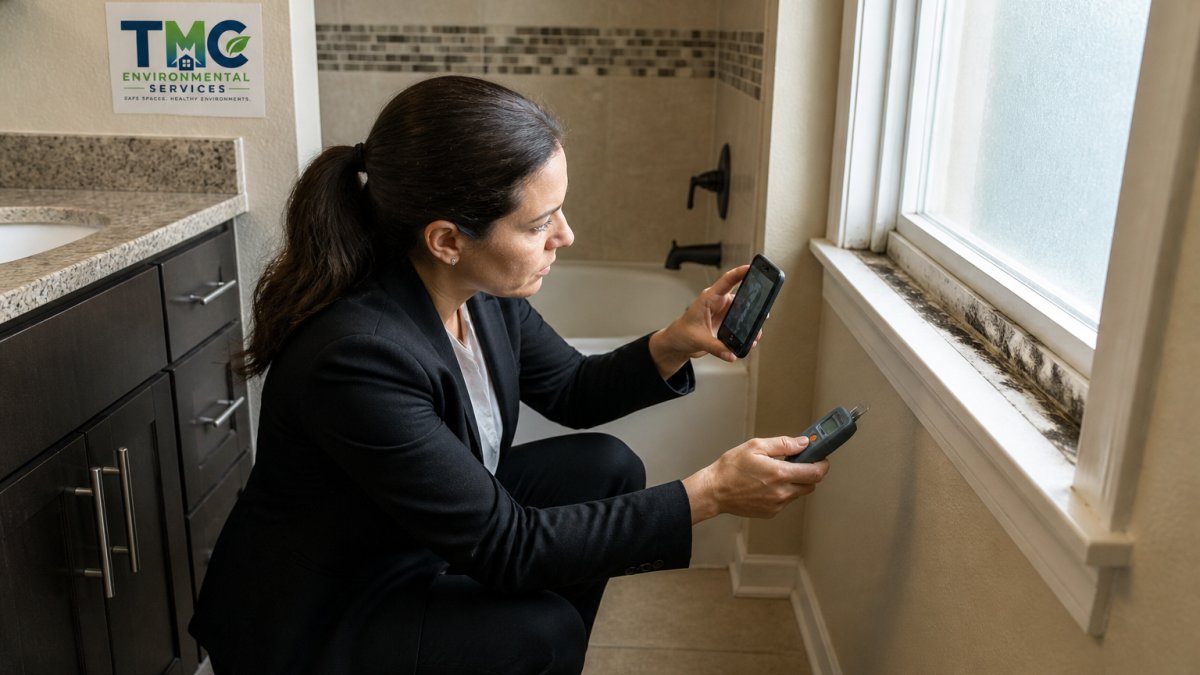
The signs of mold in a house fall into three families: what you see, what you smell, and what your moisture meter reads. Realtors can document all three. Realtors cannot interpret them as a health finding.
Visual, Olfactory, and Moisture Indicators
Visual growth looks like speckled black, green, or white patches on drywall, wood, or grout. Mold-like staining is discoloration you can’t confirm without a sample. Musty odor is a smell, not a diagnosis, and belongs in your notes as an observation.
A moisture meter gives you a number, the most useful thing you’ll collect all day, because it points to water intrusion rather than a growth pattern.
Common moisture indicators to record:
- Water stains on ceilings and walls
- Bubbling or peeling paint
- Soft or swollen trim and baseboards
- Condensation on window frames
- Efflorescence on concrete
- Damp insulation in the attic
- Rusted fasteners or nail heads
Stage 2: Showings and Buyer Questions
Buyers ask blunt questions during showings, and your answer sets the tone. Prepare three or four short, neutral responses in advance.
When a buyer points at a stain and asks “is that mold?”, the honest answer is that you can’t tell from looking. Say so. Then offer to note it and recommend further evaluation.
Keep a showing log with the date, the buyer’s question, and your response. If a dispute arises later, it shows you disclosed promptly and in good faith.
Scripts that keep you neutral:
- “I can’t diagnose that. I can note it and recommend a professional evaluation.”
- “The seller disclosed a prior repair here. I’ll send you the documentation.”
- “That’s a question for a qualified inspector. Would you like a referral?”
Never speculate about cost, severity, or health effects. Those guesses come back as promises.
Mold Testing When Buying a House: What Realtors Should Explain to Clients
Mold testing when buying a house is a diagnostic step, not a routine one. Explain the difference between a visual assessment and laboratory analysis before your client spends money.
A mold inspection is a visual, non-destructive walkthrough that maps moisture sources and documents growth. Mold testing adds air or surface sampling sent to a lab.
A test result without a moisture investigation tells you almost nothing about the cause. Fix the water first, then test if you still need answers.
The EPA guide to mold and moisture control is a useful handout for clients who want plain-language background. It explains why moisture control, not testing, is the primary fix.
Explain the trade-off clearly:
- Visual inspection – cheaper, faster, identifies the moisture source
- Air sampling – compares indoor air to an outdoor control sample
- Surface sampling – confirms what a visible patch is
- Post-remediation clearance – verifies work was done correctly
If your client wants proof for a negotiation, ask the inspector what the sample will actually prove before ordering it.
Questions to Ask a Mold Inspector Before You Refer One
The questions to ask a mold inspector come down to credentials, method, independence, and scope. Ask them in writing before you refer a client, so the answers are in your file. A referral is a recommendation, and a recommendation you cannot document is a liability.
The Credential Landscape, in Plain Terms
There is no single federal license for mold inspectors. Credentialing is private and voluntary, so the letters after a name matter less than what the inspector actually does. The credentials you will see most often fall into a few families:
- Assessment credentials – certificates and certifications focused on inspecting, sampling, and reporting. These signal training in inspection method and report writing.
- Remediation credentials – certifications focused on containment, removal, and clearance. These signal training in the work itself, not in neutral assessment.
- Board or association credentials – credentials issued by trade associations and standards bodies. They often require continuing education and a code of ethics.
- State-level requirements – a minority of states regulate mold assessment or remediation directly. Check your state’s licensing board before you refer; if your state requires a license, a voluntary certificate is not a substitute.
Ask the inspector which credentials they hold, who issued them, and whether the issuing body requires continuing education. An inspector who cannot name the issuing body is not a credential you can rely on in a dispute.
The Scope-of-Work Questions That Actually Matter
Credentials get an inspector in the door. Scope determines whether the report is useful to your transaction. Ask these before the inspection is scheduled:
- What certifications do you hold, and who issued them? Get the issuing body, not just the acronym.
- Do you also perform remediation or sell remediation services? An inspector who also sells the fix has a conflict of interest. Neutral assessment keeps the report credible in a negotiation or a courtroom.
- What does your report include? Ask for a sample. Look for moisture readings, a site diagram or photo log, a description of the water source, and a clear separation between observations and recommendations.
- Will you identify the moisture source, or only the growth? A report that lists growth without naming a water source is incomplete and will not help your client negotiate.
- How do you handle sampling, and what are its limits? Ask whether sampling is included, optional, or recommended only when visual findings justify it.
- Will you provide an outdoor control sample if air sampling is done? Air sampling without a control is hard to interpret.
- How long until the report is delivered? Inspection contingency periods are short. A report that arrives after the deadline is a report your client cannot use.
- Will you provide neutral findings for a dispute? Ask whether the inspector will testify or provide a written opinion if the transaction moves to mediation or litigation.
- What is your fee structure, and what triggers additional charges? Ask whether sampling, lab fees, and re-inspection are included or billed separately.
- Are you insured? Ask for a certificate of insurance. An uninsured inspector is a risk you are handing to your client.
Visual Inspection, Assessment, and Testing Are Not the Same Thing
One of the most common referral mistakes is sending a client to a “mold test” when what they need is an assessment. Explain the difference before your client spends money:
- Visual inspection – a non-destructive walkthrough that documents visible growth, moisture indicators, and odors. It identifies where water is or has been, not what the growth is.
- Mold assessment – a broader investigation combining visual inspection with moisture mapping, building science, and often sampling. The output names the water source and recommends next steps.
- Laboratory testing – analysis of air or surface samples. It identifies what is present in the sample, not when growth started, whether it is active, or whether it is a health risk.
A visual checklist documents observations. It does not diagnose. Make that boundary explicit with your client before the inspector arrives.
Referral Mechanics That Protect You
A referral is not a guarantee, but it can be treated as one if you are careless. A few practices keep the referral clean:
- Give more than one name. Offer two or three qualified inspectors and let the client choose. A single referral looks like an endorsement; a short list looks like a service.
- Put the referral in writing. Send the names, the credentials, and a one-line note that the client should verify scope and fee directly with the inspector.
- Do not negotiate the inspector’s findings. If the report is inconvenient, the answer is a second opinion, not pressure on the first inspector.
- Keep the report in the transaction file. If the issue resurfaces after closing, the file shows what was known and when.
At The Mold Consultant, LLC, our team holds Certified Residential Mold Inspector (CRMI) and Certified Microbial Remediation Supervisor (CMRS) credentials, and we provide neutral mediation services for disputes.
Refer inspectors who assess but don’t remediate. Independence is the single biggest factor in whether a report survives a challenge from the other side of the table.
Reading the Mold Inspection Report for Real Estate Transactions
A mold inspection report for real estate should answer three questions: where is the moisture, what did the inspector observe, and what needs further evaluation. If it doesn’t, send it back.
Read the report before your client does. Look for the moisture source, the affected areas, and the recommendations. A report that lists growth without naming a water source is incomplete.
Sampling Limitations and How to Interpret Results
Air sampling compares an indoor air sample to an outdoor control sample. Without that control, a result is hard to interpret. Spore counts vary by season, weather, and activity inside the home.
Laboratory analysis identifies what’s on the slide or in the cassette. It does not tell you when growth started, whether it’s active, or whether it’s a health risk.
Document these limits in your file. If a buyer’s attorney asks what a result proves, the honest answer is that it confirms presence at a point in time, nothing more.
A practical summary for your transaction file:
| Report Element | What It Tells You | What It Doesn’t |
|---|---|---|
| Moisture readings | Where water is present | How long it’s been there |
| Visible growth notes | Location and extent observed | Whether growth is active |
| Air sample vs. control | Relative spore presence | Health risk or cause |
| Lab identification | Organism type present | When it started |
| Recommendations | Next steps | Cost or outcome |
Stage 3: Escalation Decision Tree and Client-Safe Scripts
Escalation is a judgment call, and you should make it the same way every time. Use this decision tree on every file.
- Visible growth or staining? Document it and recommend further evaluation.
- Musty odor with no visible growth? Recommend a moisture investigation.
- Moisture meter reads elevated? Recommend a moisture source inspection.
- Prior water damage disclosed? Request repair documentation; recommend verification if missing.
- Client reports health concerns? Refer to a qualified professional; do not interpret.
- Post-remediation claim by seller? Request clearance documentation.
- Dispute between buyer and seller? Recommend neutral assessment.
Client-safe language for each escalation:
- “Based on what I observed, I recommend a professional evaluation before you remove your inspection contingency.”
- “The seller’s disclosure mentions a prior repair. I’ll request the documentation.”
- “I’m not able to interpret that result. Your inspector can explain what it means.”
Don’t let a buyer waive the inspection contingency based on your verbal reassurance. Put your recommendation in writing, even if they decline. The written record is what protects you if the issue resurfaces after closing.
The hardest part of a mold inspection checklist for realtors isn’t the walkthrough. It’s knowing where observation ends and diagnosis begins, and holding that line under pressure from a client who wants a clean answer. The Mold Consultant, LLC helps agents in the Oklahoma City metro area hold that line with non-destructive mold inspection, air quality testing, and post-remediation verification, backed by more than a decade of experience and neutral findings that hold up in a dispute. Call Now and give every transaction a documented, defensible record.
Frequently Asked Questions
What should a mold inspection include?
A professional mold inspection typically includes a visual walkthrough of moisture-prone areas, moisture meter readings, humidity measurements, and a written report documenting findings. If sampling is performed, air or surface samples are collected and sent to a laboratory for analysis. The report should distinguish between observed conditions and confirmed laboratory results, and it should recommend next steps such as further evaluation or remediation. Realtors should confirm the scope in writing before referring a client, since inspection and testing are separate services with different purposes.
Does a home inspection include mold testing?
A standard home inspection is visual and non-invasive, and it does not include mold testing or laboratory analysis. Home inspectors may note visible staining, musty odors, or moisture indicators, but they typically recommend further evaluation by a qualified mold inspector. When buying a house, mold testing is a separate service that involves sampling and laboratory analysis. Realtors should set this expectation early with buyers so a general inspection report is not mistaken for a mold clearance or a confirmation that no mold is present.
What should a realtor do if mold is found before closing?
Document the finding with photos, moisture readings, and a written note of the location and date. Notify the seller’s agent in writing and review the inspection contingency and seller disclosure requirements in your state. Recommend the buyer hire a qualified mold inspector for further evaluation rather than relying on a visual opinion. Avoid advising on remediation scope or health effects. Escrow timelines can be tight, so request the inspection report promptly and share it with the lender or attorney if the contract requires it.
How long does a professional mold inspection take?
Most residential mold inspections take one to three hours depending on the size of the property and the number of moisture-prone areas examined. Larger homes, multiple suspected areas, or sampling that requires laboratory turnaround can extend the timeline. Laboratory results typically add several business days. Realtors working against an inspection contingency deadline should schedule the inspection as early as possible and confirm the report delivery date in writing so the closing timeline is not put at risk.